A small home wine cellar isn’t just for collectors with sprawling basements. Whether someone has a handful of favorites or a growing collection, a dedicated wine storage space transforms how wine ages and tastes. A small wine cellar can fit into a closet, under stairs, or a spare corner, no mansion required. The key is understanding temperature control, humidity balance, and proper shelving. This guide walks through every step: picking the spot, controlling climate, choosing racks, and finishing details. By the end, a homeowner will know exactly what’s needed to build a functional wine storage space that protects their investment and looks intentional.
Table of Contents
ToggleKey Takeaways
- A small home wine cellar can fit into tight spaces like closets, under stairs, or spare corners while protecting wine value and flavor through proper climate control.
- Temperature consistency between 45–65°F with 50–80% humidity is essential for long-term wine aging, preventing premature oxidation and label damage.
- Horizontal sliding racks are the gold standard for wine storage, keeping corks moist and maximizing space—a 4-foot unit holds 20–40 bottles per shelf.
- Insulation with 1–2 inches of foam board and sealed doors are critical to stabilize internal temperature and reduce cooling costs in a small cellar setup.
- LED lighting (warm white, 2700K) with motion sensors or timers prevents UV damage to wine, while semigloss paint and proper ventilation protect against mold and moisture issues.
- A small wine cellar project is achievable for DIYers over a weekend without most permits, starting with location assessment and basic climate control tools like mini-split AC or wine cooler units.
Why A Small Wine Cellar Makes Sense For Your Home
Wine stored in the wrong conditions degrades fast. Heat, light, and humidity swings spoil flavor profiles and can damage labels and corks. A proper wine cellar maintains steady conditions year-round, letting wine age gracefully instead of prematurely oxidizing on a kitchen counter.
Building a small cellar also makes financial sense. Serious wine buyers protect their collection’s value. A $50 bottle can become $200+ if stored correctly for a decade. Even casual drinkers benefit: wines taste noticeably better when stored at 45–65°F with 50–80% humidity, which is why many homeowners prioritize this project.
Small cellars are approachable DIY projects, too. Unlike renovating a basement, a homeowner can insulate and climate-control a closet or under-stair space with basic tools and materials. The work doesn’t require framing or electrical permits in most cases (though always check local codes), making it realistic for weekend warriors.
Choosing The Right Location And Space
Best Locations For Wine Storage
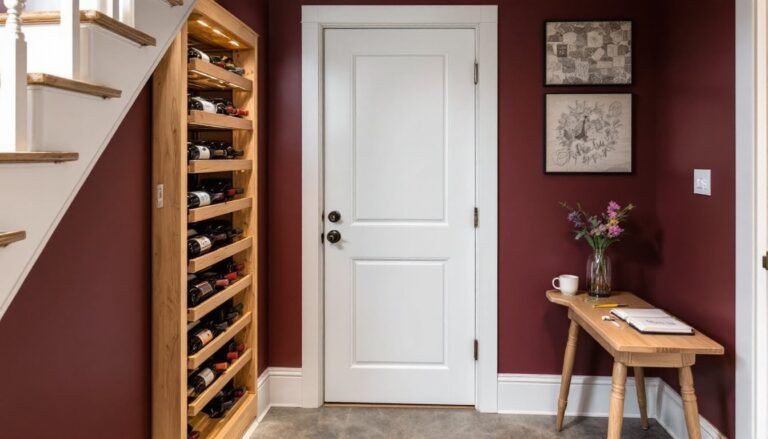
The best spot is cool, dark, and away from vibration. Basements work if they stay dry and temperature-stable: crawl spaces are often too damp. Closets on interior walls (away from exterior walls and direct sunlight) are ideal for smaller collections. Under-stair spaces, dedicated cabinets, or even a spare bedroom corner can work if climate control is added.
Avoid kitchens, laundry rooms, and spaces near heat sources like furnaces or water heaters. Exterior walls cause temperature swings, especially in winter and summer. Spaces above or next to garages also fluctuate too much.
Measure the space carefully. A standard wine bottle is 12 inches tall and 3 inches in diameter. Horizontal racking (bottles laid flat) is ideal but requires more depth. Vertical storage takes less space but isn’t best for long-term aging. A small closet (4 by 4 feet) holds roughly 100–150 bottles in a compact setup.
Check humidity levels before committing. If a space stays damp, moisture damage is inevitable. If it’s bone-dry (under 40% humidity), a humidifier becomes essential. A basic moisture meter (under $20) reveals baseline conditions before any work begins.
Temperature And Humidity Control Essentials
Temperature consistency matters more than the exact number. Ideally, aim for 45–65°F with minimal fluctuation. A 1–2°F swing monthly is fine: a 10°F daily swing ruins wine quickly. Humidity should sit between 50–80% to protect corks and labels without promoting mold.
For small spaces, a through-wall air conditioner or compact wine cooler unit handles both needs. Units like dual-zone wine fridges maintain separate temperatures in upper and lower chambers, perfect for storing reds and whites together. Prices range from $300 to $2,000+ depending on capacity and precision.
Alternatively, a standard mini-split air conditioning system (ductless) works well for closet-sized spaces. Installation requires running refrigerant lines, which is best left to a licensed HVAC technician. This route costs $1,500–$3,000 but provides precise, long-term climate control.
For humidity, silica gel or passive desiccant packs work in very small spaces (under 100 bottles). Larger setups benefit from an active humidifier, the kind used in wine cellars maintains target humidity automatically. Pair it with a hygrometer (humidity meter, ~$15–$50) to monitor levels weekly.
Insulation is critical. Even a small space should have 1–2 inches of foam board or spray foam insulation on walls and ceiling. This stabilizes internal temperature and reduces cooling demand. If building in a closet, seal the door with weatherstripping and a gasket to prevent warm air infiltration.
Shelving, Racking, And Storage Solutions
Wine racks come in five basic types: horizontal sliding racks, angled wall racks, modular wire systems, wooden wine racks, and freestanding wine coolers with integrated racks.
Horizontal sliding racks are the gold standard for long-term storage. Bottles rest at a slight angle (5–10 degrees), keeping corks moist and labels forward-facing. These racks maximize space, a 4-foot-wide unit holds 20–40 bottles per shelf. Expect to spend $50–$150 per shelf unit.
Wall-mounted angled racks work in tight spaces and look polished. They hold 8–12 bottles per unit and are easy to access. Installation requires finding studs and using lag bolts rated for at least 50 pounds of load per mount point.
Modular wire systems (like kitchen shelving) are budget-friendly ($100–$300 total) and rearrangeable. They don’t keep bottles horizontal, so they’re better for shorter-term storage (under 3 years).
Wooden racks add warmth and can be built custom with 1×4 or 1×6 pine lumber and oak dowels (3/4-inch diameter). A basic wooden rack for 16–20 bottles costs $60–$100 in materials. Plans are widely available, and most DIYers can assemble one in an afternoon with a drill and pocket-hole screws.
Measure carefully and account for bottle access. A homeowner doesn’t want to pull every bottle to reach one at the back. Stagger racks or use pull-out drawers for deep shelves. Test the weight: a single bottle weighs roughly 2.5 pounds, so a 40-bottle shelf needs support rated for 100+ pounds.
Finish with paint or polyurethane on wood to prevent moisture damage. Avoid varnish or heavy stains, they off-gas and can transfer odors to wine.
Lighting, Design, And Finishing Touches
Light damages wine. UV rays accelerate aging and fade labels. Install low-wattage LED lighting (warm white, 2700K color temperature) and keep it off except when accessing bottles. Motion sensors or a simple 15-minute timer prevents accidental overexposure.
Walls should be painted or sealed to prevent moisture and dust. A semigloss or epoxy paint works better than flat paint in humid conditions, it wipes clean and resists mildew. Walls painted in deep, neutral tones (charcoal, deep blue, or burgundy) add visual interest while minimizing reflected light.
Floring matters too. Concrete in basements is standard, but tile or vinyl plank holds up better in damp spaces. Avoid carpet, it traps moisture and harbors mold. If a space has a concrete floor, consider a vapor barrier underneath any flooring to block ground moisture.
Ventilation prevents mold and stale air. A small exhaust vent or passive air exchange (like dryer ductwork running to exterior) refreshes the space quarterly without disrupting temperature. This is especially important in sealed closet conversions.
Final touches: Add a small table or counter for note-taking and tasting. A thermometer and humidity gauge on the wall make monitoring easy. Label shelves by region or varietal if the collection grows. These details transform a storage closet into a space that feels intentional and welcoming. The This Old House guide to home additions covers structural details relevant to planning any built-in storage space.
Conclusion
Building a small home wine cellar is achievable for any DIYer willing to spend a weekend on planning and installation. The core steps, pick a cool, stable location: control temperature and humidity: install proper racking: and add finishing touches, are straightforward and don’t require professional permits in most cases. Start with a space assessment, invest in basic climate control, and build racks that work for the specific collection size. The result: a dedicated space where wine ages gracefully and tastes the way it should.